Preface
All LoRaWAN devices are already enlisted in a KELLER TTN account. If you do not want to claim ownership over the TTN communication and just want to see the data on the KOLIBRI Cloud, then you can go to Step 2 and program the device according your use case (measure/send interval) and update the device time. After this you can skip all steps until Step 10. Nevertheless, we recommend to overtake the ownership of the device in TTN and re-program the App EUI / App Key and enlist the device in an own application.
‘Add a New Device to your TTN V3’-Guide
What you need
- An account on ‘The Things Network’. If you do not have one than please sign up on https://www.thethingsnetwork.org/
- A KELLER LoRa device (ADT1 LoRa or ARC1 LoRa)
- GSM setup tool and a USB connector cable (ARC1: K114 interface converter / ADT1: Micro USB cable)
- The Device EUI number of the device (Use the GSM setup tool to extract the EUI)
- The Application EUI number of the device (Use the GSM setup tool to extract the EUI)
- The KOLIBRI Endpoint URL which is:
https://devspakellercloudfunctionapp.azurewebsites.net/api/HttpTriggerCSharp_PascalTTN?code=eQxVYd76shpatS8av6lzsn3XxNEbtCiE9psrJaasyeMk/fudmQQ5uw==
Step 1
- During the order of the device ask your sales person to let the device pre-configure by the KOLIBRI support team. This helps to speed up and simplify your configuration work. Technical documentation for the configuration of a KELLER LoRa-device can be found here.
Step 2
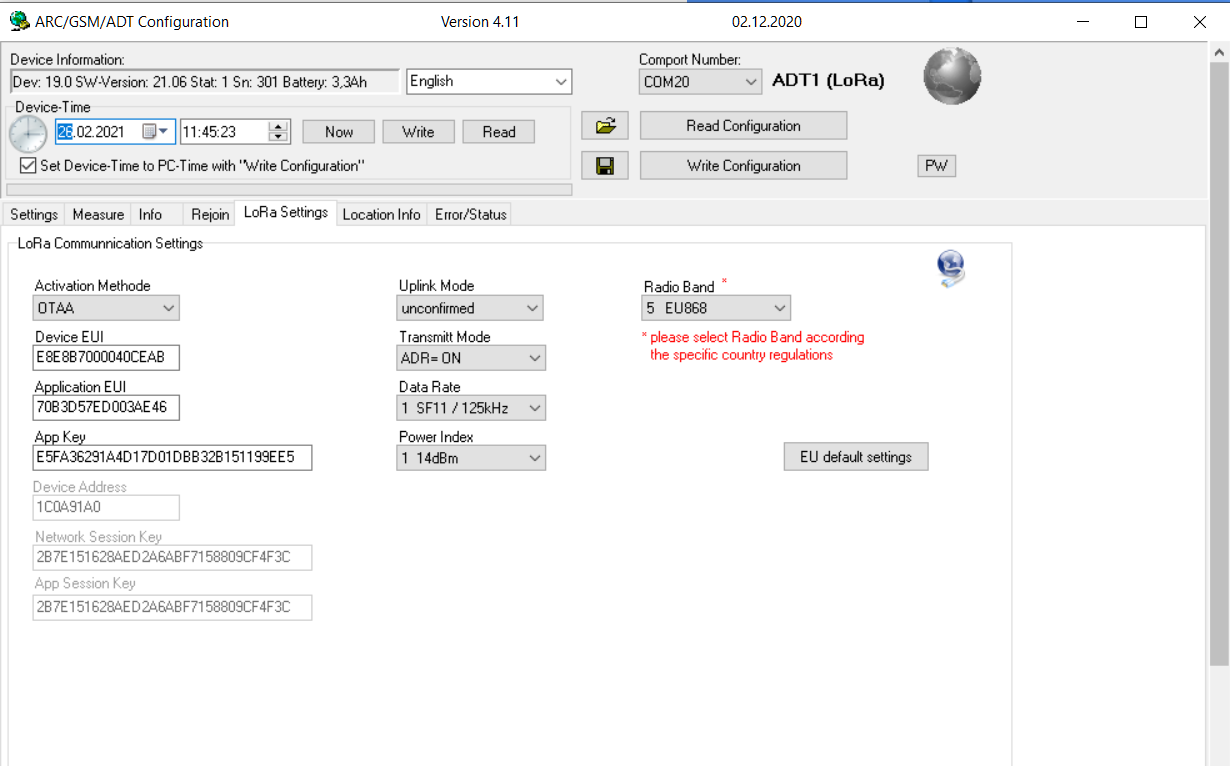
- Connect your PC using the GSM setup tool and
- Program your device according to your use case (See How to configure a LoRaWAN device)
- Do not forget to re-program the ‘App EUI’ and ‘App Key’ as the device is already enlisted in a KELLER TTN account. With the re-programming of the ‘App EUI’ and ‘App Key’ you have the complete ownership of the device and its transmission.
- Write down the ‘Application EUI’, ‘App Key’ and the ‘Device EUI’
Step 3
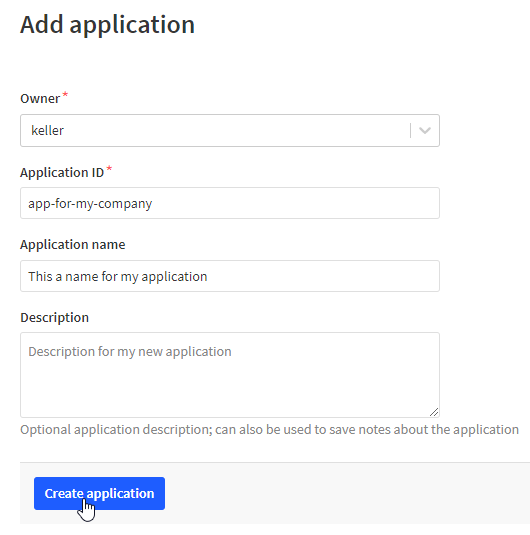
- Go to https://eu1.cloud.thethings.network/console/ and +Add Application if you do not have one. Set an Application ID and the Owner.
Step 4
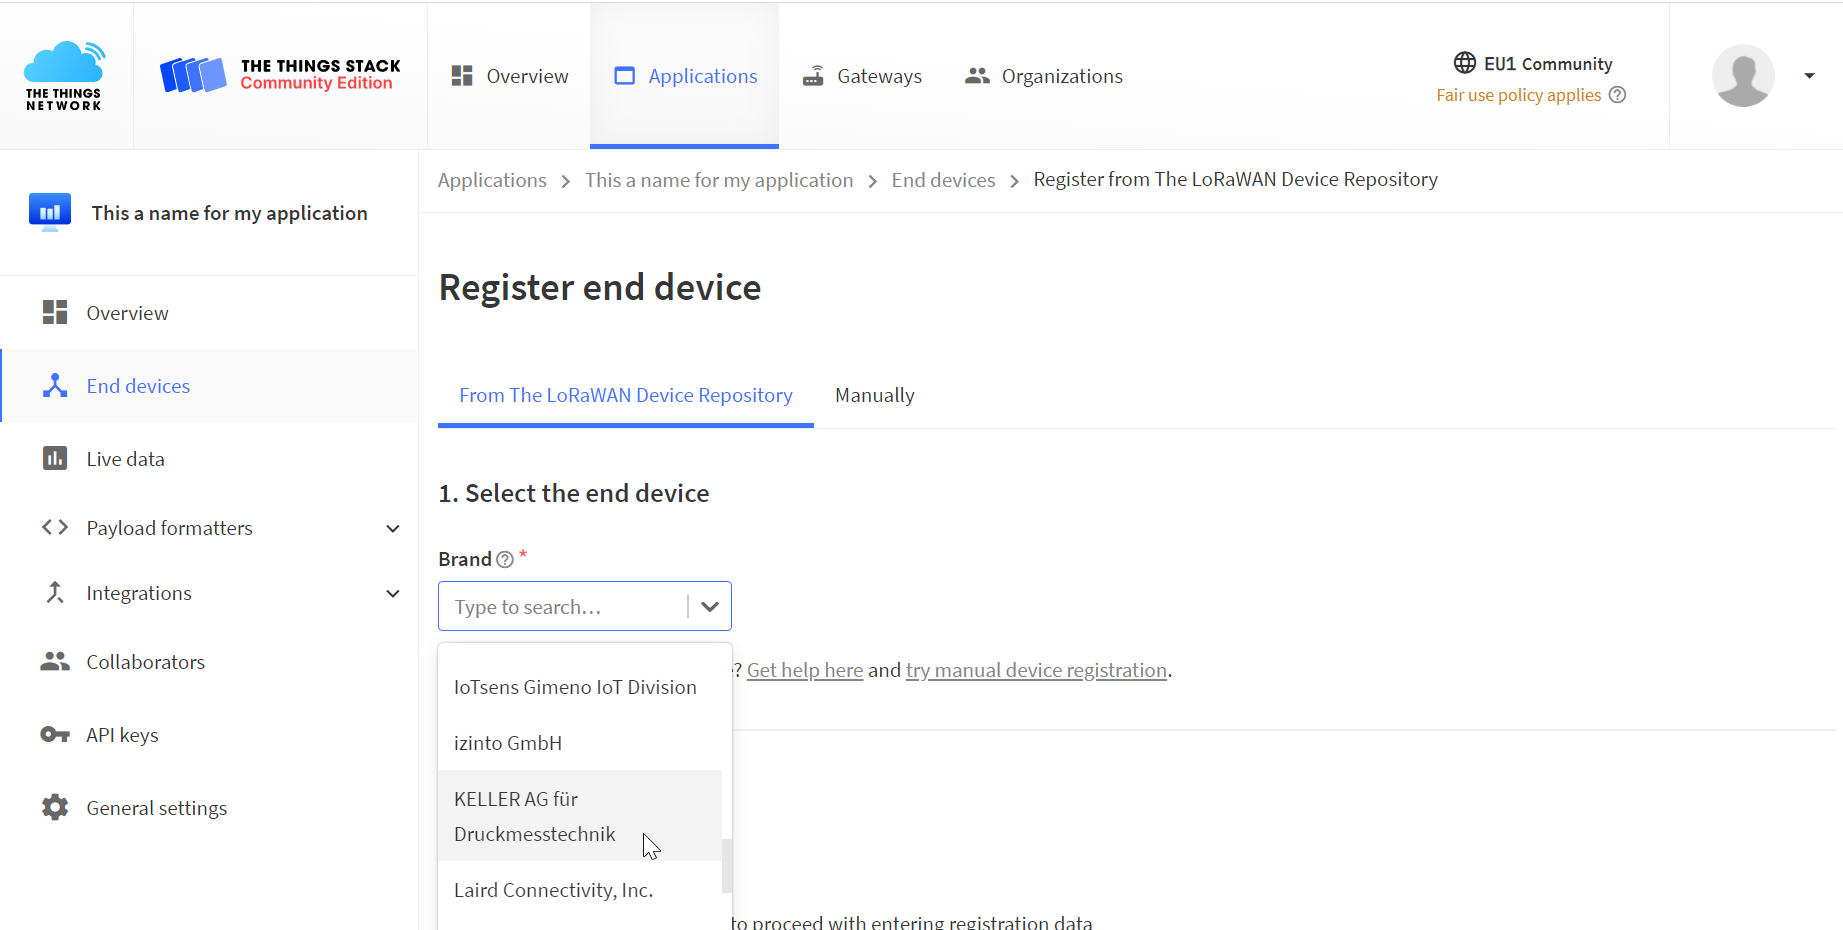
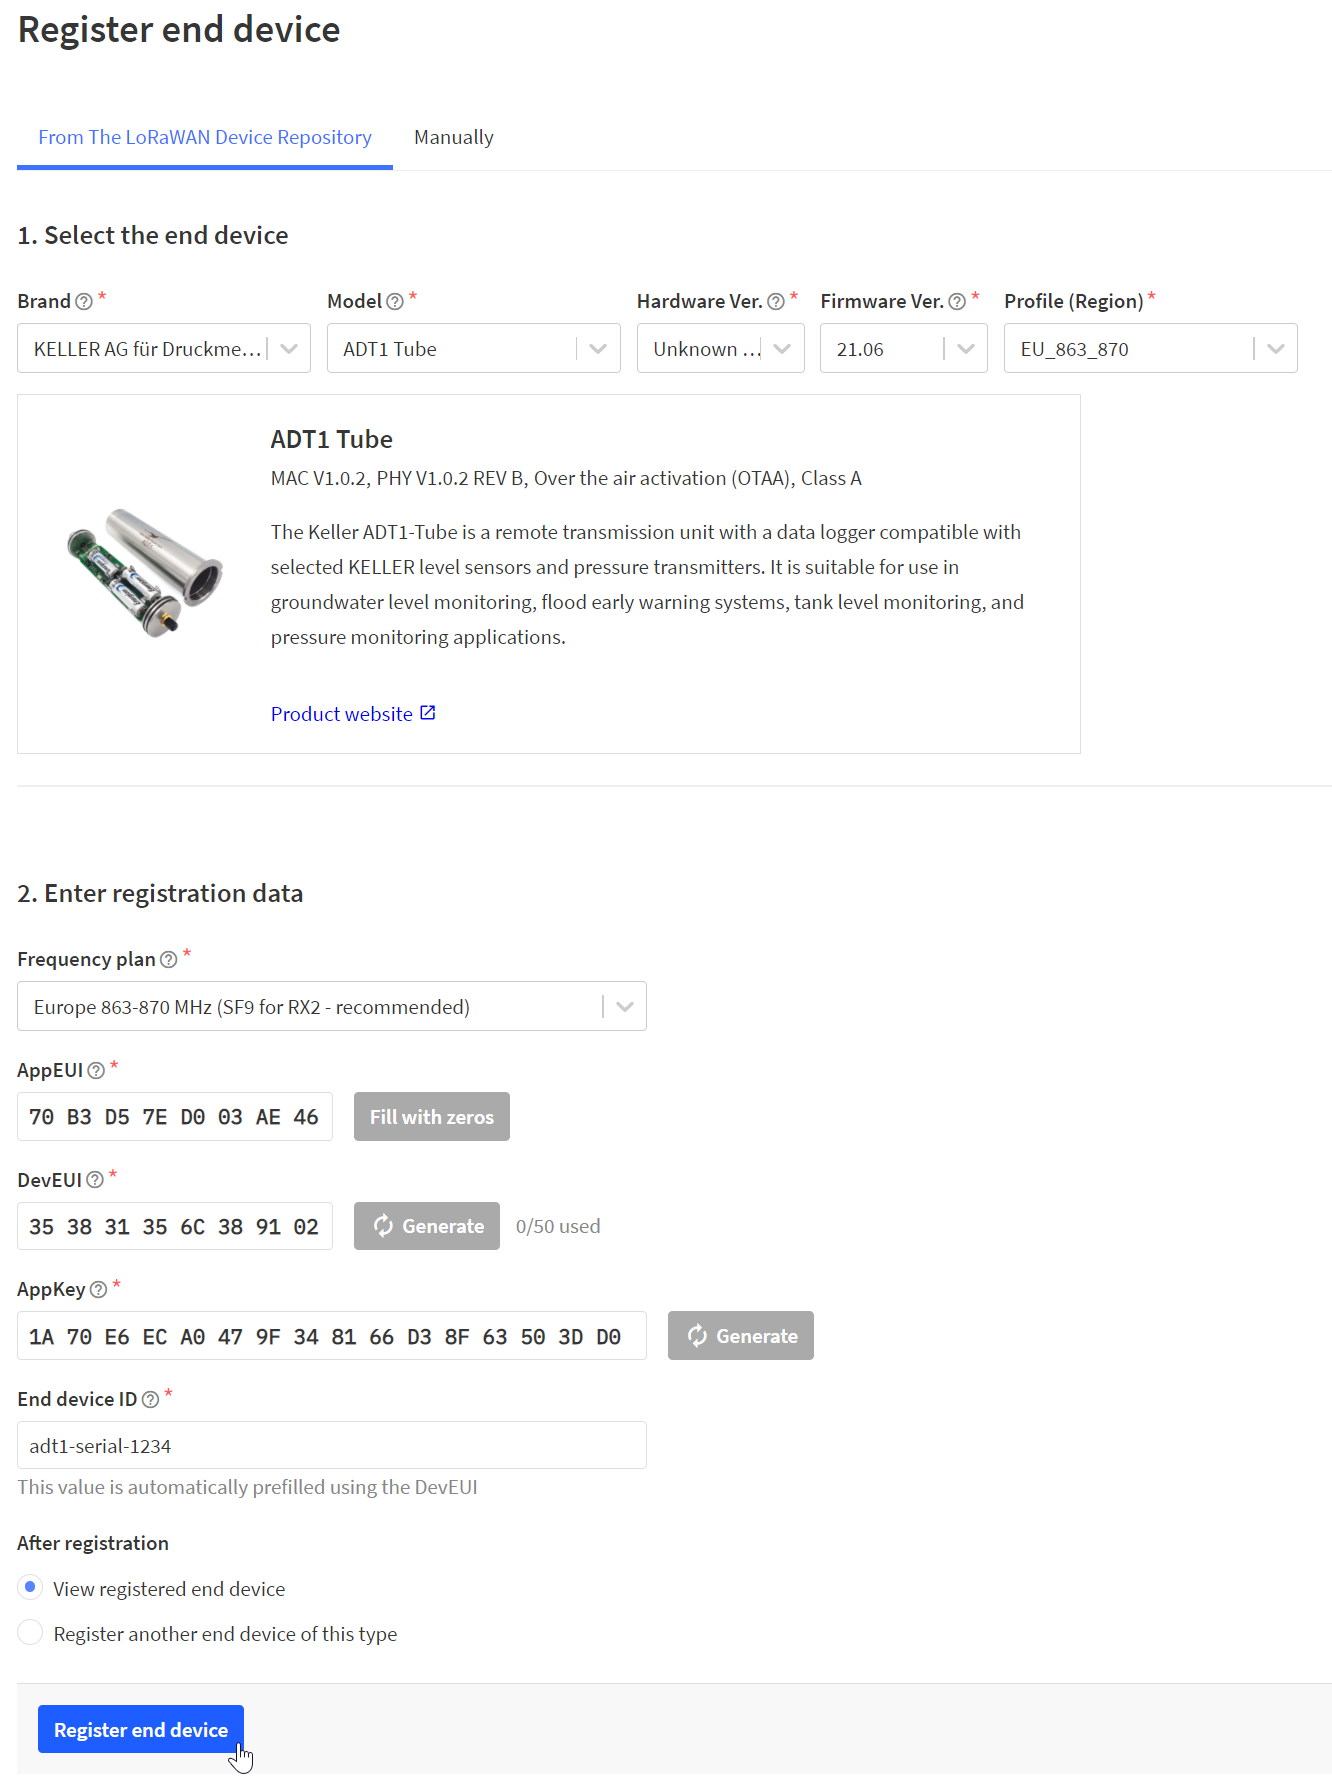
- In the application (e.g. https://eu1.cloud.thethings.network/console/applications/app-for-my-company) +Add end device with
Step 5
- Choose the Brand which is KELLER Pressure
Step 6
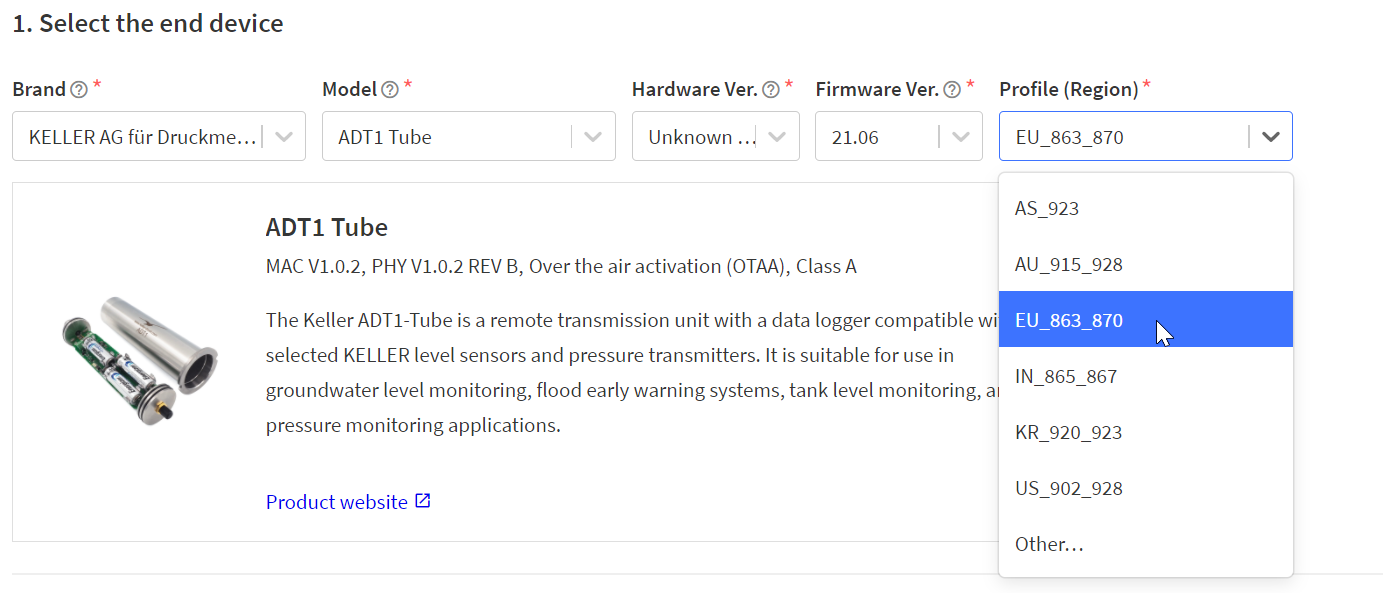
- Choose the Model which is either
- ADT1 Tube
- ADT1 Box
- ARC1 Tube
- ARC1 Box
- Choose the correct Profile for your region. In Europe this is EU_863_870
Step 7
- Now enter the ‘Application EUI’, ‘App Key’ and the ‘Device EUI’
- Enter a device id text to identify the device in the TTN portal
Step 8
- If you have a TTN gateway in reach, you should now be able to communicate with the TTN server.
- When you want to register a new TTN gateway into TTN then go to https://eu1.cloud.thethings.network/console/gateways/add
- Enter the Gateway EUI from the Gateway and choose a Gateway ID
- Use the same frequency plan and set the Gateway Status to Public
- Ensure that your gateway’s communication is not blocked by your or your company’s IT firewall.
Step 9
- To send data to the KOLIBRI Cloud it is needed to forward the transmissions.
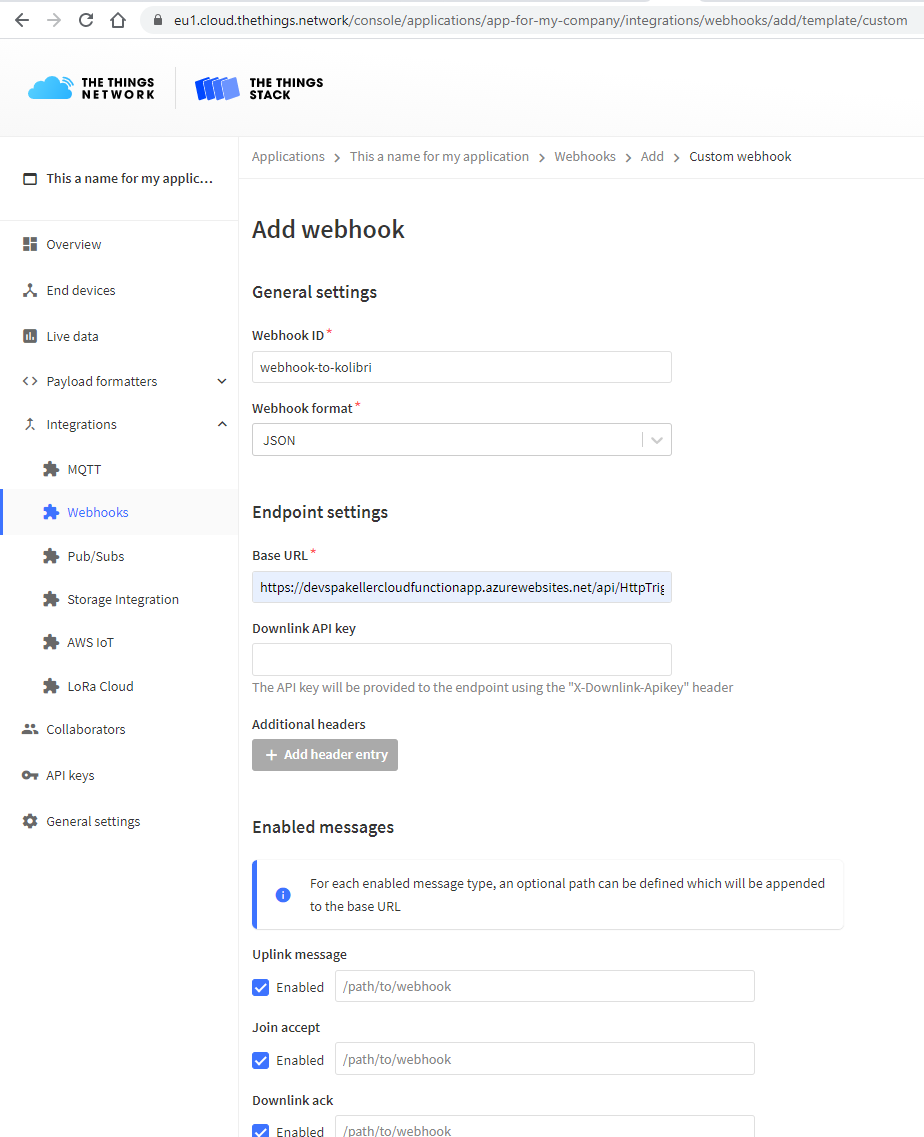
- Go to Integrations and +Add Webhook in Webhooks
- Choose Custom webhook
- Choose a Webhook ID such as webhook-to-kolibri
- Webhook format is JSON
- Base URL is
https://devspakellercloudfunctionapp.azurewebsites.net/api/HttpTriggerCSharp_PascalTTN?code=eQxVYd76shpatS8av6lzsn3XxNEbtCiE9psrJaasyeMk/fudmQQ5uw== - Enable all Uplink messages
- Press Add webhook.
This will forward a transmission to the KOLIBRI Cloud.
Step 10
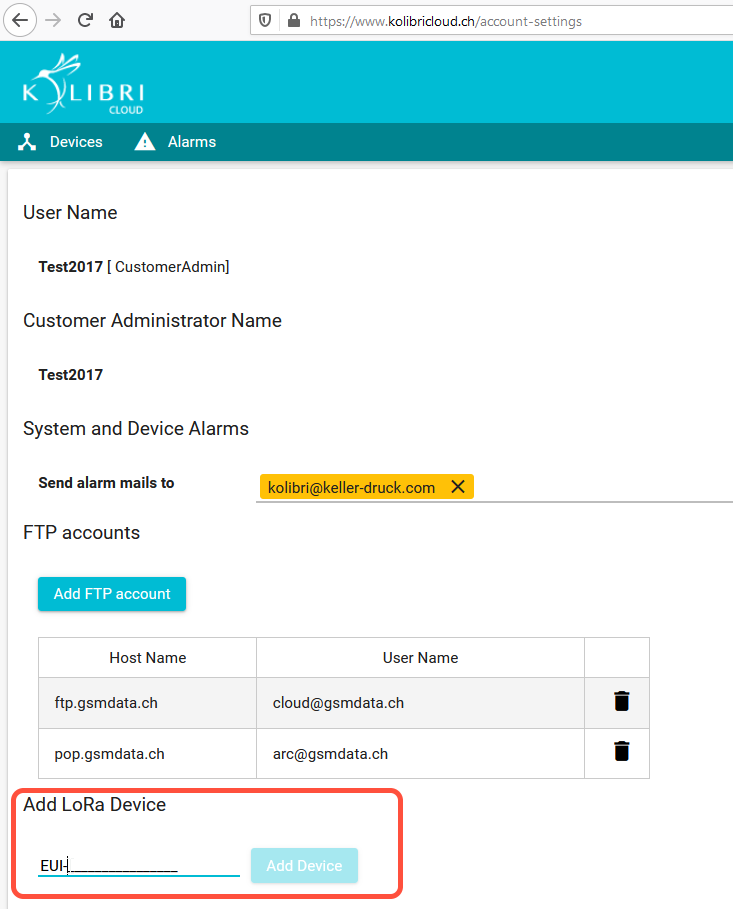
- To make your device visible on https://www.kolibricloud.ch it is needed to add it
- In the Account Settings on https://www.kolibricloud.ch enter the Device EUI of the LoRa device and press Add Device
- The device should now be visible in the device list. If adding is not possible and a red popup is shown, please contact the KOLIBRI Support Team kolibri@keller-druck.com
‘Add a new device to TTN’-Guide — Old Manual Process
What you need
- An account on ‘The Things Network’. If you do not have one than please sign up on https://www.thethingsnetwork.org/
- A KELLER LoRa device (ADT1 LoRa or ARC1 LoRa)
- GSM setup tool and a USB connector cable (ARC1: K114 interface converter / ADT1: Micro USB cable)
- The Device EUI number of the device (Use the GSM setup tool to extract the EUI)
- The Application EUI number of the device (Use the GSM setup tool to extract the EUI)
- The KOLIBRI Endpoint URL which is:
https://devspakellercloudfunctionapp.azurewebsites.net/api/HttpTriggerCSharp_PascalTTN?code=eQxVYd76shpatS8av6lzsn3XxNEbtCiE9psrJaasyeMk/fudmQQ5uw==
Step 1
- During the order of the device ask your sales person to let the device pre-configure by the KOLIBRI support team. This helps to speed up and simplify your configuration work. Technical documentation for the configuration of a KELLER LoRa-device can be found here.
Step 2
- Go to https://eu1.cloud.thethings.network/console/ and +Add Application if you do not have one. Set an Application ID and the Owner.
Step 3
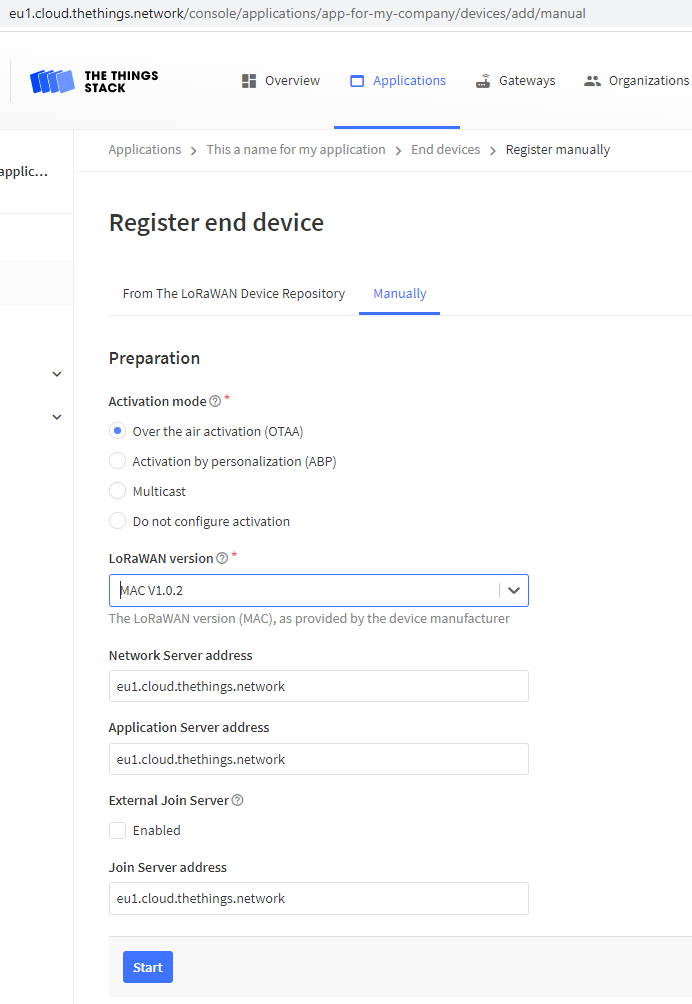
- In the application (eg https://eu1.cloud.thethings.network/console/applications/app-for-my-company) +Add end device with
- Activation mode: OTAA
- LoRaWAN version: MAC V1.0.2
Step 4
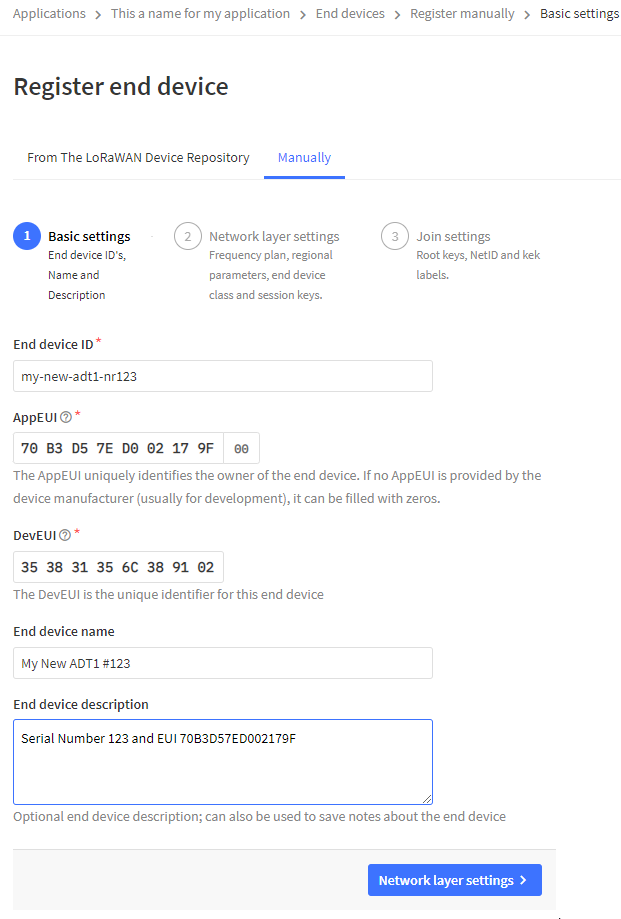
- Set the Basic settings by
- Choosing an End device ID name
- Entering the AppEUI from the device (See How to configure a LoRaWAN device)
- Entering the DevEUI from the device (See How to configure a LoRaWAN device)
Step 5
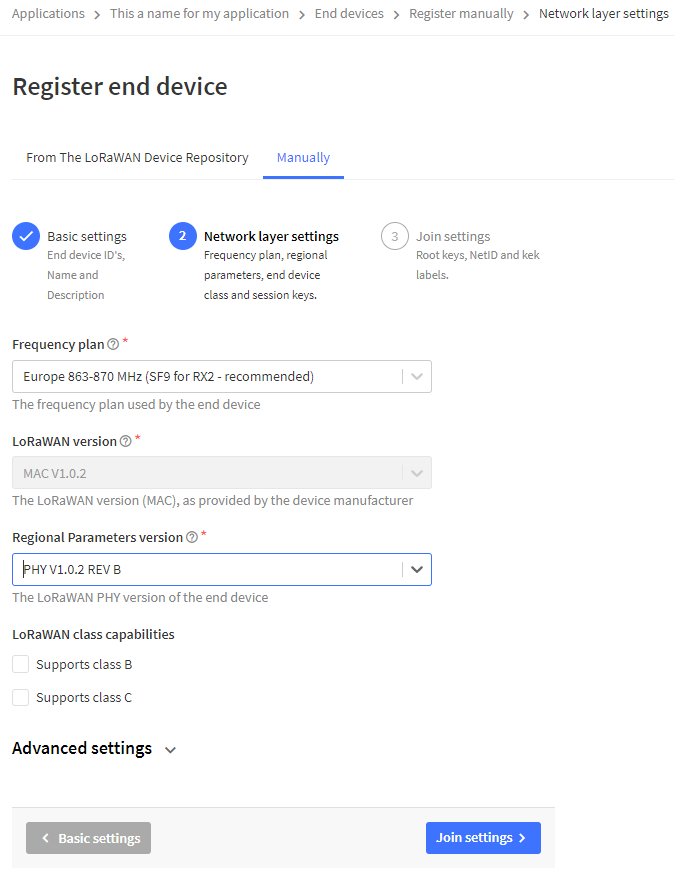
- Set the Network layer settings by
- Choosing a frequency plan. In Europe choose “Europe 863-870 MHz (SF9 for RX2 - recommended)"
- Choosing Regional Parameter version: PHY V1.0.2 REV B
Step 6
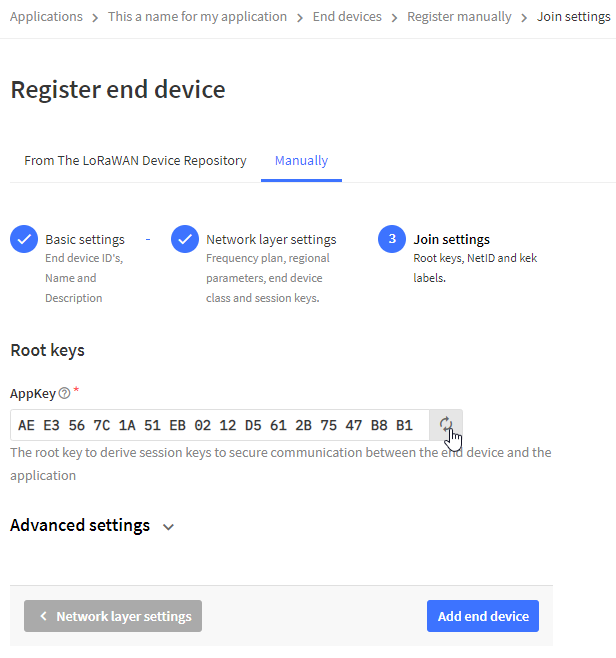
- Set the Join settings by
- Generate an AppKey and store the key. This key is needed to assign, verify and program the device.
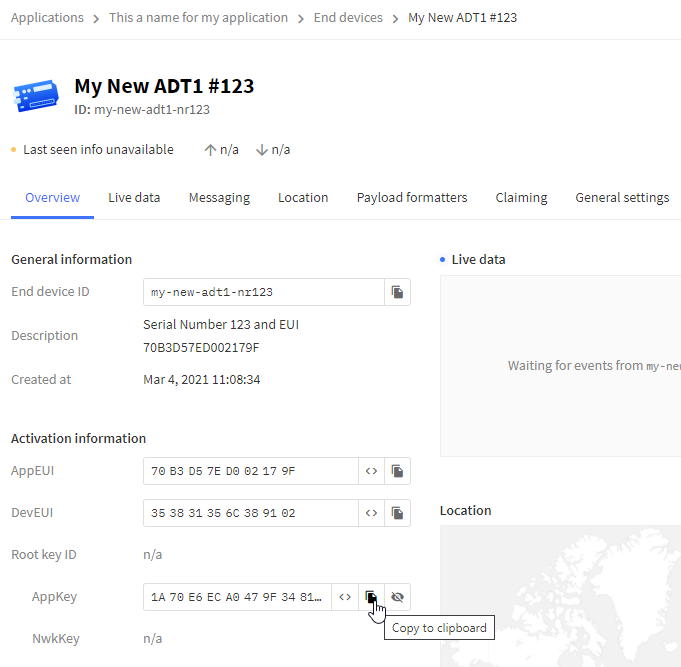
- If you forgot to store the key, it is also possible to copy the key after adding the device:
Step 7
- Connect your PC using the GSM setup tool and
- Check if you used the same Application EUI
- Enter the generated App Key from Step 6
- Program your device (See How to configure a LoRaWAN device)
Step 8
- When you have a TTN gateway in reach you should now be able to communicate with the TTN server.
- When you want to register a new TTN gateway into TTN V3 then go to https://eu1.cloud.thethings.network/console/gateways/add
- Enter the Gateway EUI from the Gateway and choose a Gateway ID
- Use the same frequency plan and set the Gateway Status to Public
Step 9
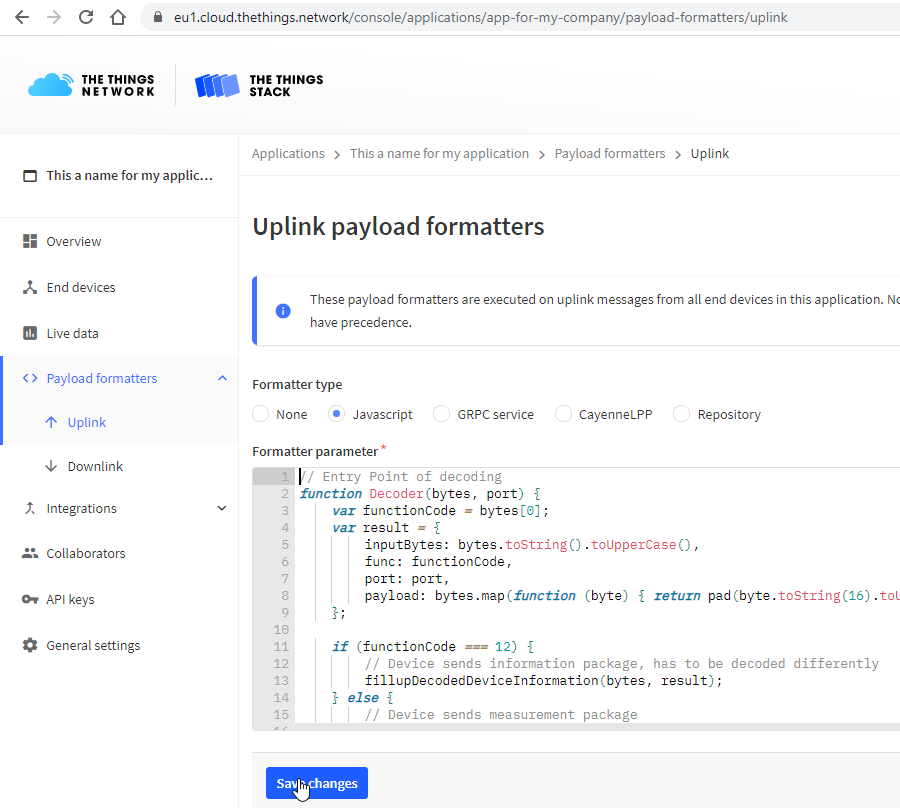
- This step is optional. You can add the KELLER Payload Decoder to decode the payload string into readable Measurements/Information visible in the Live-Editor.
- The most recent KELLER Payload Decoder code is on GitHub
- Got to Payload formatters in your application and paste the decoder code into Uplink using Javascript formatter type.
Step 10
- To send data to the KOLIBRI Cloud it is needed to forward the transmissions.
- Go to Integrations and +Add Webhook in Webhooks
- Choose Custom webhook
- Choose a Webhook ID such as webhook-to-kolibri
- Webhook format is JSON
- Base URL is
https://devspakellercloudfunctionapp.azurewebsites.net/api/HttpTriggerCSharp_PascalTTN?code=eQxVYd76shpatS8av6lzsn3XxNEbtCiE9psrJaasyeMk/fudmQQ5uw== - Enable all Uplink messages
- Press Add webhook.
This will forward a transmission to the KOLIBRI Cloud.
Step 11
- To make your device visible on www.kolibricloud.ch it is needed to add it
- In the Account Settings on https://www.kolibricloud.ch enter the Device EUI of the LoRa device and press Add Device
- The device should now be visible in the device list. If adding is not possible and a red popup is shown, please contact the KOLIBRI Support Team kolibri@keller-druck.com
wait until the KOLIBRI Cloud support assigned the device to your group.
